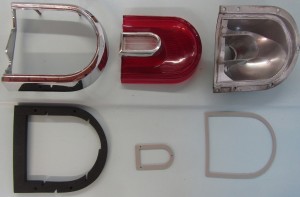
Balancing Tail Light Intensities article is the result of a Colonial Region member pointing out that the brightness of the lights appeared out of balance on the rear of my 65 Mopar. There are 4 light assemblies in this case with the outer lights displaying brake & tail lights while the inner lights were tail lights only. A Tail Light Assembly consists of rim, lens, reflector, and gaskets:
The effort to perk up the light brightness to be uniform & bright involved:
- Removing tail lights assemblies, disassembling, & washing dust & mud off inside of red lenses
- Cleaning dust off reflectors
- Removing faulty/leaky gaskets
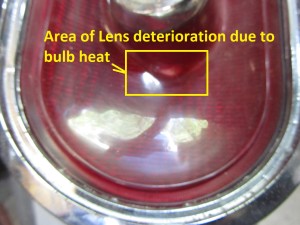
- Replacing some deteriorated lenses (caused by heat off the excessively close incandescent bulbs & UV (sun))
- Using new gaskets
- Spraying cleaned reflectors with highly reflective “chrome” paint
- Replacing oxidized light sockets
- Adding grounds to each light assembly
- Replacing all light bulbs with identically marked new bulbs from same package after (wait for it…..)
- Converting inner single filament tail light sockets to…….. dual tail light sockets
- Wiring inner tail lights such that only the inner tail light portion of the inner sockets would be functional only
- Upgrading each bulb to LED type to reduce heat generated under nearby lens
The overall theory was that not only were the effects of gasket, UV, dirt, and oxidization deterioration over time involved but also the original design involved high heat producing incandescent bulbs held close to the lens causing a significant lens failure. Have someone step on the brake for awhile and touch the lens (or use a temp gun) to see if your lens has a hot spot near where the bulb is located. If your current lens has distortion, has turned white, or cracked in that area your lens may be failing from the effects of the heat source placed too close too the lens such as in this condition:
The effort of cleaning, rebuilding, replacing defective components, adding grounds, and upgrading bulbs addressed the assumed causes of the brightness variations.
The effort paid off with not only brighter, uniform lights but also a reduction in current draw (as noted on the instrument panel gauge).
It should be noted that several type of LED bulbs were tried. Some Phillips LED bulbs interfered with the socket tangs and would not install into the replacement sockets:
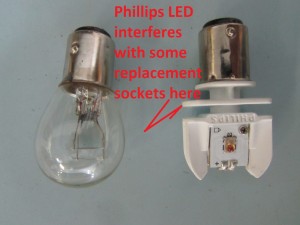
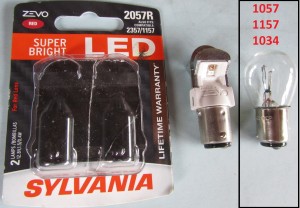
The Sylvania LED called out in the below pictures did not have that interference problem.
Incandescent & LED Comparison:
Summary
If your tail lights have been in service for 50 years suggest you compare brightness and consider digging in to eliminate the dust, mud, oxidation, reflector deterioration, ground deterioration, and bulb performance. After all, everyone following you are use to seeing decently bright tail lights from all the modern vehicles and may not react with appropriate prompt braking to anything that doesn’t measure up to those standards. Be safe.
Vector Files for the above Balancing Tail Light Intensities are as follows: