5 Minute Wiring Check is all about looking under your Plymouth hood at one important spot. Your mission is to avoid an on the road breakdown that could leave you stranded or worse.
Vector file for the material:
5MinuteWiringCheck (.doc)
5MinuteWiringCheck (.pdf)
Content of the file is as follows:
5 Minute Wiring Check
5 Minute Wiring Check picks a Mopar wiring connector with a high potential for failure. The objective is to insure reliability for your next tour in your 40 to 60 years old Mopar with original wiring.
Where to look?
Look at the center portion of the firewall where a bundle of wires appears to be plugged in. Call it the Bulkhead Connector. It might look like this if it is not in serious trouble yet:
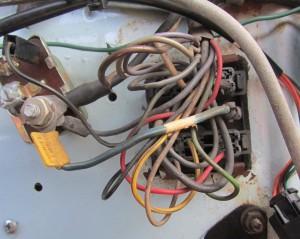
Not pretty but functional original 1965 Bulkhead Connector.
Background Info
Chrysler products had “in dash” ammeters for many years to indicate the charging rate to the drivers. The ammeter was placed near the driver on one side of the firewall while the battery & generator/alternator was on the other side of the firewall. After a few years Chrysler decided to bring the heavy duty high current wiring from the battery/alternator to the ammeter directly thru the firewall for measuring current. A connector was used on many models to connect the engine wiring harness to the instrument panel harness at the firewall. This Bulkhead Connector might have been adequate when the connection terminals & wire connections were freshly made but time & moisture can take a toil.
Our 35 Dodge truck does not have a firewall Bulkhead Connector since the continuous & uninterrupted heavy duty wires were routed thru the wiring harness down the frame rails and emerged on both sides of the firewall to connect directly to the ammeter, battery, and generator circuits without ever passing thru the firewall. However, our 65 Dart has the firewall Bulkhead Connector which has seen moisture & oxidization as well as heat from not only the engine but also heat from the high current passing thru the battery/alternator/ammeter wiring & terminals. Consider the many years of exposure & high current present and the potential for a failure has increased with time. Several Mopar people have experienced this based on the number of published stories.
Consider what happens if your battery becomes discharged due to something as simple as the headlights left in the on position while parked. A jump start may get you going but there is a sudden surge of near maximum power from the alternator trying to charge the battery. Suddenly the Bulkhead Connector is subjected to a higher than normally current flow which might be enough to put it “over the top” in terms of heat generated at the connection. Melting or worse could be the result. Things get aggravated if, thru the years, the alternator was “upgraded” to a higher output alternator when the factory original needed rebuilding or replacement and direct exact replacement alternators were hard to find locally.
What to look for?
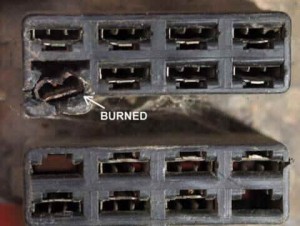
Visible melted Bulkhead Connector plastic or damaged wire insulation as shown below:
Provided below are several links to ideas explored and tested by others with the Bulkhead Connector in their Chrysler product. Two major categories of Options included:
- Rebuilding Bulkhead Connector and/or replacing wiring with new wiring
- Leaving existing Bulkhead Connector & wiring as is but reducing the current flow thru the Bulkhead Connector by adding wiring circuits bypassing the Bulkhead Connector
Various methods for each major category are reflected in the supplied links but be aware that some may eliminate a functional ammeter in which case a voltmeter is added near the operator to allow for battery monitoring.
Some Theory Links:
http://www.moparfins.com/Repairs/Electrical/Bulk_Head_Connectors.htm
https://www.allpar.com/history/mopar/electrical.html
http://www.madelectrical.com/electricaltech/amp-gauges.shtml
http://www.slantsix.org/forum/viewtopic.php?f=1&t=24643&hilit=ammeter+bypass
Summary
Best to take a few minutes to inspect the Bulkhead Connector to see if there is evidence of the onset of overheating already present in which case it’s best not to use your favorite Chrysler product until a fix is initiated. Taking action now to make a lasting repair could improve the reliability of the electrical charging system, minimize damage potential around the Bulkhead Connector area, & reduce the chance of your car succumbing to Bulkhead Connector failure consequences.
I’ll come back in part 2 on the method used on my 65 Dart that allowed that ammeter to stay “as is” as well as the antique bulkhead connector by sending the high current thru an all new protected circuit.