Replacing Worn Distributor Bushings is covered before doing Distributor Cap Quality Part 2 since a “loose” distributor shaft will substantially impact the Distributor Cap Quality Part 2 and Part 3 efforts going forward.
The vector files for the Replacing Worn Distributor Bushings are:
Replacing Worn Distributor Bushings (doc)
Replacing Worn Distributor Bushings (pdf)
Although the pictures are for a Slant Six the Flathead Six with Chrysler distributor (not Prestolite) use a bushing with the same dimensions as the Slant Six.
Content of the above files is as follows:
Replacing Worn Distributor Bushings
Replacing Worn Distributor Bushings occurs when there is a whole lot of shaking going on. If your distributor is 40 to 80 years old and never had bushings replaced or has seen limited lubrication during maintenance of the engine then you might want to investigate if it is contributing to hard starts, rough idle, or lack of power.
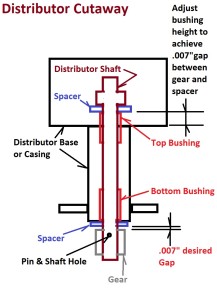
The center shaft of the distributor can wobble due to worn bushings effecting both electronic ignition and points type ignition performance. If you have never looked into a distributor here is what your shop manual may show in an exploded view:
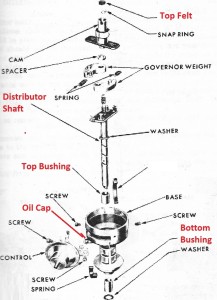
The Top Bushing and Bottom Bushing are installed in the Distributor Base & guide the Distributor Shaft nicely if they are not worn. Lube oil in top felt & oil cap help.
There is a quick inspection that can be made to see if the side to side play of the Distributor Shaft is exceeding factory allowed tolerances. A feeler gauge is used to measure how the gap is changing when you press sideways on the Distributor shaft. If the change in gap exceeds .006” when you shake the Distributor Shaft back and forth then your distributor is a likely candidate for new bushings:
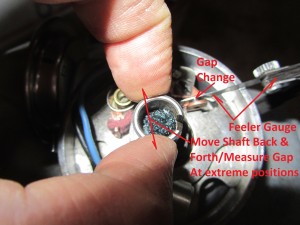
The above example is with points ignition; electronic ignition is similar but measuring changes in reluctor gaps. Consider the bushings good if the gap is not changing more than .006”. Be careful not to rotate the shaft which will invalidate the results.
A recent test of a “remanufactured” distributor yielded a gap change of .020” and highly noticeable opening and closing of the points which means the distributor had limited unacceptable rebuilding. Your shop manual should have enough information to disassemble your distributor but limited detailed info on replacing bushings which will be covered next. The manual might have a reference to unique Chrysler product tools but we’ll do the job with the following tools.
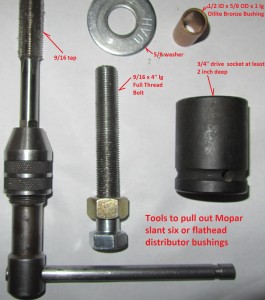
To pull out Mopar Slant Six or Flathead Six Distributor Bushings:
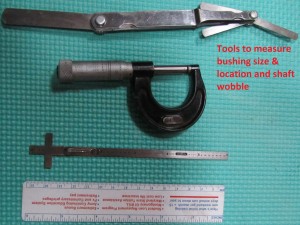
Tools to measure shaft wobble, clearances, bushing size, and depth of bushing:
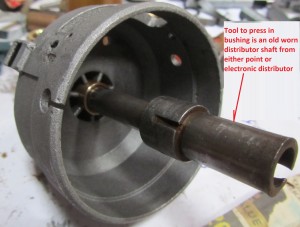
Tool to press in bushing:
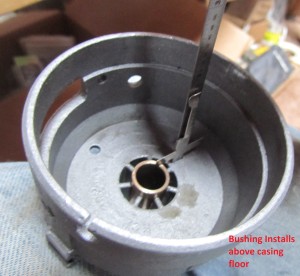
Before removing the top bushing measure the location of the bushing. You might find out that it is approximately 5/32” above the floor of the distributor casing:
The dimension helps determine the position of the bottom pinned gear or collar and we will modify it slightly to do a clean install of the gear in the right position to achieve a factory clearance dimension. More review on this after the new bushings are partially installed.
Pulling Bushings
The method used to remove the bushings is to pull them by threading a bolt into the bushing (full depth of the bushing) and then using a nut pressing against a deep spacer to pull on the bolt/bushing combination until the bushing is extracted.
Grab the 9/16 tap & start cutting a thread in the top bushing by turning in several turns, backing the tap up, removing debris, oiling threads, re-turning the tap into the bushing, and continuing the process until you have fully developed threads in the top bushing. Don’t stop however just keep going and start cutting threads in the bottom bushing. Once done remove the tap from both bushings.
Thread the oiled bolt/nut/socket spacer assembly into place as shown here:
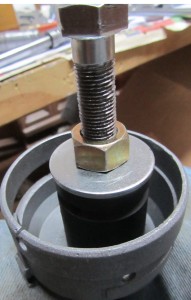
Run the nut down the bolt until the bushing is removed.
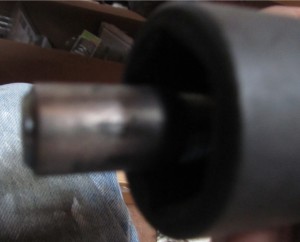
The extracted bushing will be threaded up the bolt and must be removed from the bottom of the bolt:
The bottom bushing is pulled from the bottom in a similar fashion to the top bushing. Bushings pull easily without excess force & the process can be quick.
Installing Bushings
The bushings are pressed in using a spare distributor shaft. The greater the wear on the spare distributor shaft the easier the pressing can be done & spare distributor shaft removed after the pressing is completed. Note that the top bushing is pressed in from the top of the distributor casing & the bottom bushing is pressed in from the bottom with the distributor base or casing upside down.
Locating Top Bushing
As previously noted the top bushing is not pressed all the way down in the distributor. Pressing the bushing partially in (say ¼ inch off the floor) and then installing the distributor shaft and measuring clearances allows one to “sneak up” on the best top bushing location for your casing, shaft, new distributor gear, and new gear spacer. The following illustration helps to identify the top bushing height adjustment and the impact on the gap between the gear and spacer:
See the following kit with new gear, spacer, and roll pin used to secure the gear:
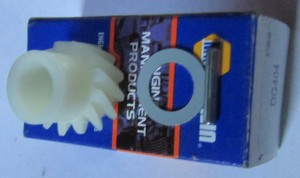
The gear has a starter hole that is intended to help in the installation of the gear. Since the location of the top bushing will be freshly new there is an opportunity to place the top bushing in the right location to allow the gear hole to align with the distributor shaft existing hole (with the correct clearance or gap of .007” between the bottom spacer and the gear).
In practice the bushing is installed slightly high and then the distributor shaft is installed temporarily to allow for a test fit of the gear. Then if the spacer to gear gap is not enough the shaft is removed and the bushing driven slightly deeper. The shaft is re-inserted and the gap checked again. Repeat this sequence of lowering the top bushing until the proper gap is achieved.
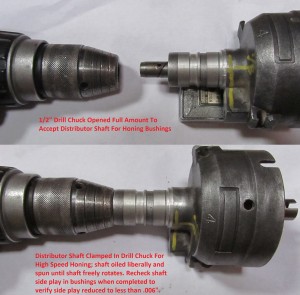
Honing Bushings
Before installing the gear permanently, hone the bushings using the distributor shaft. Lube the distributor shaft thoroughly before installing and attach a 1/2” drill to the bottom of the shafts. Rotate at high speed for a few minutes to align the bushings and wear off the high spots as shown:
Assemble Distributor
Re-assemble the balance of the distributor using the shop manual instructions. This is your opportunity to replace governor weight springs, lube pivot points, replace vacuum diaphragm, etc. so that the distributor will perform according to specifications for many years and improve starting, idling, and power of the engine going forward. Combine with High Quality Distributor Caps/Rotors for best results.
Excellent articule, very valuable information. Thanks to take the time and effort to put this together. It helped me, a lot!.
.
If you have any tips to add, especially if you ran into an issue during your efforts to get your bushings operating to specs, please forward them and I will add those tips into the article. This is especially important as this particular Restoration Article covers 1933 thru 1987 and one expects there is a possibility of a unique consideration in any one of those years.
Don
I found a simple way to remove distributor shaft bushings. I’m working on a 1060’s Prestolite Mechanical Tach Drive Dual Point Big Block unit that has those standard 5/8″ OD 1/2″ ID bronze bushings. I’ll let you know where I found cheap replacements but this technique should work on older ones that have smaller bushings. Using a tap (in my case a 9/16″ which usually doesn’t come in a standard tap and die set which goes up to 1/2″ taps). I completely tapped the top and bottom bushings which removed some of the bronze material and thinned it out. I then simply took a long flat head screw driver and whacked it with a hammer ( go through the top for the bottom bushing and bottom for the top bushing). Both popped out intact with easy and no damage to the housing.
Make sure you test fit the bushings on the distributor shaft before pressing them in (simple with a press as they seat flush in the housing so no guessing is needed. Make sure you grease the shaft up and filled the little greaser up with grease. This is expecially important if you have tach drive distributor. Make sure the gear turns easily and is greased.
I found those bushings on a google search but here is the link that takes you directly to the bushings which are relatively cheap-maybe you can find other size bushings here.
https://www.mcdonaldcarb.com/product_p/90-2595.htm
Sorry, I can’t spell very good or is it well! This applies to non mech tach drive distributors as well.
Corrections-1960’s mopar distributor from a 1964? 413 but these fit most big blocks including Hemi’s. I am converting mine to a Pertronix pickup (call them for the proper kit) and fitting it with a CM from 4 Seconds Flat Ignition Control Module Part # HRR688. Go to there website for your correct parts. They make complete kits and has interesting info and articles and the ability to get rid of the ballast resistor.
No, I don’t make money from any of these companies!
https://www.4secondsflat.com/Ignition.html
I hope I am not intruding on anyone’s post as I know this forum deals with lots of older cars but they really are the same stuff!