Extended Idle Car Starting
The Extended Idle Car Starting restoration article is the results of a Region member asking how to start a 1950 Plymouth after being idle for 10 or more years:
Cars not prepared for storage may need extra prep steps to avoid damage to the engine when starting. Gasoline sitting in the fuel system along with antifreeze in the cooling system along with exposure to cyclic temperature & humidity changes add more reasons to consider the extra prep effort.
If your car fits any or all of these descriptions then it’s advised to take steps to reduce or minimize the effects on a stationary car engine over that long timeframe.
The concerns of the effects of humidity, corrosion, fuel contamination, and lubrication jump to the surface as top causes for concern on:
- Is there rust on the cylinder walls?
- Is the oil contaminated to the point of sludge being present?
- Has a gas/water vapor mix caused deterioration of the gas tank?
- Are the normally lubricated surfaces become excessively “dried”
- Has the coolant system seen excessive corrosion?
The Plymouth and Dodge flathead sixes are great motors to prepare for starting since it is normally easy to remove an oil pan while the engine is in the car, access spark plugs & squirt oil onto the nice flat/horizontal surface of the piston, access the oil gallery from a factory provided oil port, pull a head, and access critical parts of the carb. Gas tanks also pull out relatively easily compared to some modern car tanks. Stuck water pumps can be a challenge to access in the space provided but it’s do-able.
Initial Prep steps taken in order:
- Blow compressed air around spark plug to remove accumulated dirt & rust
- Remove spark plugs, put in a tablespoon of oil, and replace with new plugs
- Drain Gas Tank and inspect fuel for water & rust & dirt
- Remove Gas Tank for cleaning (or replacement) if contamination present
- Drain oil from oil pan and remove oil filter if present
- Note condition of the oil; if dark or sludge is present then drop oil pan*
- Clean inside pan, oil pump strainer & accessible engine parts of sludge
- Add oil filter if filter not present
- Drain coolant and inspect coolant color and upper inner radiator tank
It’s decision point on the radiator & water pump since a blockage in the radiator or engine block distribution tube could be a major cause of overheating in the future and the corrosion you can’t see is likely greater than what you can see.
Pulling the water pump and radiator is your likely course of action after a 10 year idle time & inspect the engine block coolant distribution tube:
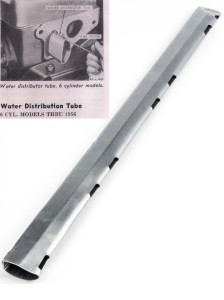
The end of the tube is visible from behind the water pump and blockage is to be expected. Brass tube may be your best investment for the long term.
See this article for more info on the water distribution tube:
http://www.plymouthcarclub.com/2015/10/coolantdistribution/
Sending the radiator to a shop for cleaning and testing will determine what is required in that portion of the coolant system.
Your next big decision is whether to pull the head to see if the cylinder bores are rusted and require treatment. Pulling the head is relatively easy and lets you not only examine for cylinder wall rust but also replace a corroded head gasket. Avoiding a leak of coolant is one of the goals but avoiding a leak causing loss of compression would be another. If the cylinder walls need treatment honing the walls where the piston is down in the bore is on the agenda. Then slight rotation of the crank will allow for honing another location where a piston is adjusted down in the bore.
Assembly may be where you are likely going next since the easily accessible & visible portions of the engine have been exposed but I’d be pulling pistons/rods, checking piston wall clearances/taper, replacing rings & pins, checking for troublesome rod insert bearing clearances, etc. since your already there!!!
Assembly steps:
- Insert new water distribution tube and install water pump
- Lube cylinder walls
- Install head & new gasket before installing radiator & hoses
- Replace Oil Pump Strainer, Oil Pan, and filter after cleaning
- Pre-Lube Engine Bearings** before topping off oil level.
- Install Gas Tank, remove Carb top, and fill float chamber with fresh gas
- Replace Carb top, install/clean air filter, and assemble air cleaner to carb.
- Rotate engine with coil wire removed to further lube bearings
- Add Coolant
Starting steps:
- Fully charge battery
- Check for spark by holding coil wire near block while manually opening points with key in “On” position; reinstall distributor cap & coil wire
- Briefly spray starting fluid into carb; replace air filter (spark arrestor)
- Start engine using key
* If your wondering if you can skip the oil pan removal by using a detergent oil consider that the detergent oil will loosen sludge and it will clog pump strainer as well as run sludge thru the small engine passages. The oil filter on a Plymouth or Dodge flathead is the “Bypass” type which means only a portion of the oil flowing thru the oil passage is cleaned. All of this boils down to “it’s not recommended to use detergent oil except in relatively clean engines”.
** Pre-Lube article located here:
http://www.plymouthcarclub.com/2016/02/pre-lube-engine-preceding-starting/
Colonial Region has a home brewed pre-lube pump available for members if you are without one in your garage.
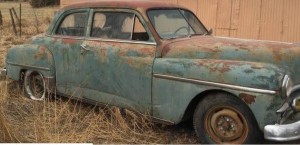
I have a 1928 Plymouth Sedan in my barn. It has been in there since 1942… driven in during a snowstorm at the beginning of WW 2…and never driven since. A true “BARN CAR”. One owner and then me in 1965. It does not run and has no rust but a lot of dust. It has wooden spoke wheels. I have some digital pictures for any one interested in restoring this possible gem.
Best, Bob G.
Sounds like a nice Plymouth to restore seeing that it has no visible rust. In order to put a listing together for the Colonial Region website it would be best to furnish a location (so people in africa are not asking about a car in Washington State) and a few pictures of the front, rear, side, and interior. Also furnish the model/body style. Engine number helps establish if the engine is original to the car. Send it to Don Palmer at my email & I will promptly put it in the “For Sale” category of the Region Website. If you have questions on where to see the engine number and Vehicle ID number I can research that and get back to you. Good luck finding a great home for your Barn Car.
Is your 1928 Plymouth sedan still available? If it is could you email me photos?
The seller has determined it’s actually a late 31 by going to a tech adviser with VIN and engine #. As of yesterday he was attempting to get a front end photo thru a barn window. He already has submitted photos of one side, interior, and rear which have been posted on this website. If you want a 31 and want hardcopies of the photos I can print them for you after he has secured the front end photo.