Early A Body Quarter Repair Panels addresses a question received on 60’s Valiants, Barracudas, & Darts. Content of the response is on the following vector files:
EarlyABodyLowerRearQuarterPanels (.doc)
EarlyABodyLowerRearQuarterPanels (.pdf)
Content of the file is as follows:
Early A Body Quarter Repair Panels
A recent question about rear lower quarter repairs on a Mopar Early A-Body suggested this article. Some 60’s Valiants and Darts fall in this category.
If you are among the group needing Mopar Early A-Body Rear Lower Quarter Panel Repair and have been searching for repair panels either for your favorite body shop or your own use you may have come up against the following:
- Replacement lower rear quarters appear to be offered in 2 unmatched pieces per side
- The panel intersection at the rocker panel has a different seam versus OEM orientation
- Replacement lower rear quarter panels seem to extend up to the factory trim molding
- The two repair panels offered were too long to be used together without modification
Below pictures show quarter panel repair on a 65 4 door. The front lower rear quarter repair panel (FLRQRP) extends to the door line which put the front vertical weld right on the bend of the door opening which I considered a nice location for blending in the weld. The FLRQRP (as purchased) extended all the way back to several inches beyond the tire opening which I considered an advantage so as to place the butt welding in a relatively flat area of the panel. This feature eased the blend welding and final body work outside the sharp contours of the wheel opening bead.
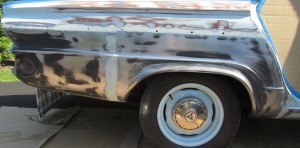
The 4 points noted above needed to be resolved (unless of course you have found a supplier for a single rear lower quarter panel sized for your car).
It takes two panels to fully repair one lower rear quarter since the reality is that your needed repairs likely extend down the wheel opening and right back to the bumper. Neither panel furnished handle that situation so the two panels must be butt welded together. Both panels can not be butt welded together without modifications since they need to be shortened in order to fit the A body dimensions.

In the above picture note the FLRQRP was installed as received without any modifications but the rear panel had to be cut to match the FLRQRP. The cutoff can be seen in the picture.
An accurate cut line was achieved by temporarily installing the rear lower panel first (use bumper bolt, upper trim holes for clamping bolts/washers, and welding clamps at the lower edges of the panel). Then the front panel was laid over the rear panel and a scribe mark made at the future butt welding seam.
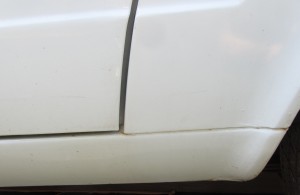
The next area to be noted is the normal rocker panel seam and the new FLRQRP seam differences. The OEM rocker panel seam is horizontal along it’s entire length right up to the wheel well. The new FLRQRP places it’s seam vertical at the edge of the door. This may be of importance to those wanting a strict OEM look. Some may see an advantage to the vertical seam in that it reduces rust out that occurs between the rocker panel seam and the quarter panel seam in front of the wheel well. The factory OEM horizontal rocker panel seam:
The above show the rust creep starting along the seam. The following picture occurs when the FLRQRP is installed with the vertical seam virtually eliminating the horizontal rocker seam:
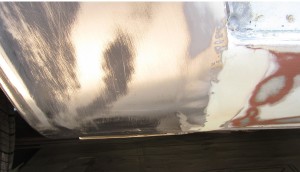
Although maybe acceptable to a “Driver Car” those preferring a direct copy of OEM would need to modify the panel to achieve that look.
Hopefully this info addresses the question of replacement quarter panels on early A body’s.