Driving Your Plymouth During The Warm Months – Part I
Improving Water Flow to Keep Your (Engine) Cool is the first in our three part “keeping cool” series covering tips and techniques to prevent your flathead six from overheating during the summer months. If your dream of driving your Plymouth is being interrupted by reliability issues caused by high flathead six engine temps then read on…
Cooling – Keeping yours
Early Plymouth 6 cylinder cooling systems show weaknesses when pressed into severe duty (severe duty being a relative term). Sitting in long lines of traffic on a warm summer day or climbing hills or just driving at posted speeds may brings on a “severe” event.
A Plymouth owner takes a deep breath as they drop into these everyday conditions and the eyes focus on the temp gauge. At this point the gauge starts moving up and the owner thinks 1) is it the rebuilt engine, or 2) the rebuilt radiator, or 3) the overhauled water pump or the 4) slow fan & airflow or 5) the “extreme conditions or 6) the new thermostat or 7) the new belt has loosened or 8) the ? At this point a passenger, if present, would begin to recall the last event. If things get bad enough it’s over to the side of the road.
This is not exactly the Plymouth image or excitement that the driver had intended for in the dream. Nor is it a good way to encourage your passenger to travel with you again. Finally you have done everything to Factory specs and this is where you are.
What happens if?
1) improve water flow quantity
2) improve water flow distribution
3) increase cooling capacity
What if you could do that in a way that defies being a noticed deviation from authentic original?
First up…….Pump modification to improve quantity
A Plymouth engineer does not have to be consulted if you compare late model six pumps with the early flat head six pumps. Plymouth water pump impellers moved from a single blade (with no end cap) to 5 blades and an end cap in later years. Even the smallest slant six carried a 6 bladed impeller. So Plymouth engineers already did the research and give you an answer:
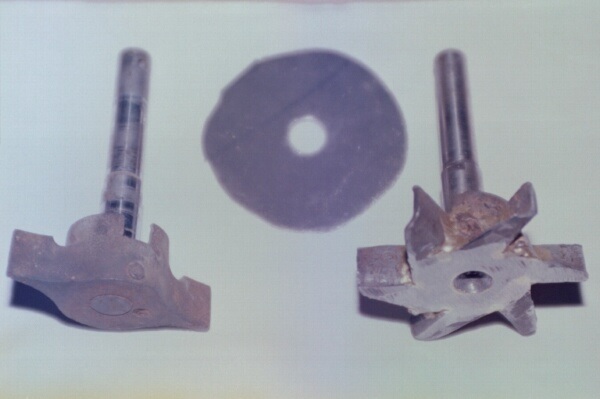
Increase your existing water pump output by tuning up the existing impeller. The below pictures show the difference between an original early model Plymouth impeller and a tuned up impeller. The final impeller is a slant six impeller grafted onto an original impeller shaft. An end cap is installed also on the impeller blades to prevent water from “jumping” over the blades (still further increasing pump output).

Below is the completed impeller with the end cap assembled.
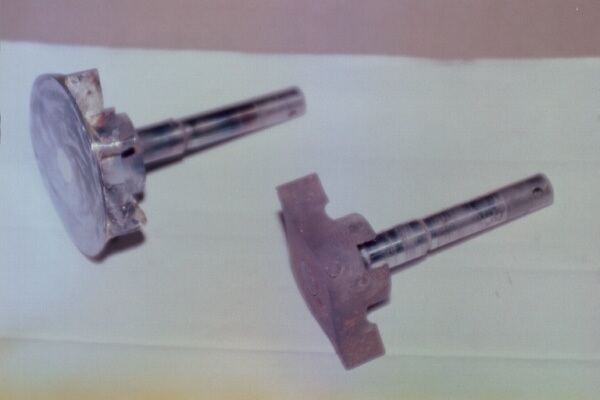
Braze the slant six impeller to the cast original single shaft. After brazing the end cap on, check for squareness & flatness by applying blue dye to the cap, assembling the pump(without gaskets) and rotating the shaft. High spots will scrape off the blue dye indicating areas to be ground.
Note, in the following picture, the difference between the fit of the new & old impeller in an original pump body. The blade to body clearance must be checked for each impeller blade to insure adequate, but not excessive clearance. Allow at least .01 inch to compensate for uneven expansion rates of the steel impeller and cast pump body.
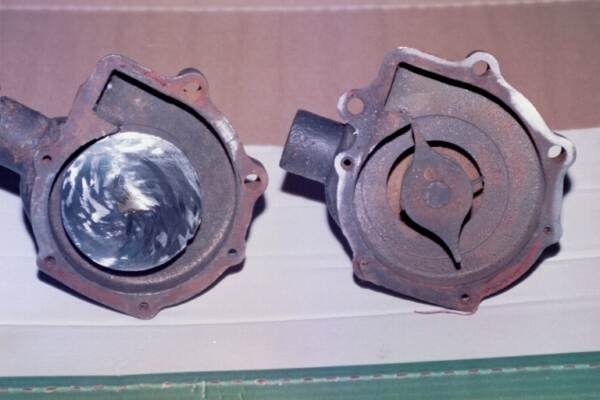
Late model high volume 5 bladed impeller pump with end cap is available as a replacement extremely close in pump body style to the original (which makes it a bolt in improvement!). It may not match the capability of a 6 bladed impeller with end cap but it’s a lot less work. These pump bodies could be recognized as not authentic original however.
So check out your pump and see if the pumping capacity could be improved by adopting the Plymouth engineered impeller…….it worked to let us drive in 100 degree heat cross country in traffic, over the highest of hills……all at posted speeds.